GLP-1 Injection Site Rotation: A Guide for Safe Therapy
Learn the importance of GLP-1 injection site rotation to ensure safe treatment, prevent skin complications, and optimize drug absorption effectively.

Estimated reading time: 8 minutes
Key Takeaways
- Rotate injection sites among the abdomen, thigh, and upper arm to protect skin and fatty tissue.
- Proper rotation prevents lipohypertrophy, scarring, and unpredictable absorption.
- Use correct subcutaneous technique—clean skin, pinch a fold, inject at 90° (or 45° if lean), and wait 5 seconds.
- Track each injection, clean and prep sites, and dispose of needles safely.
Table of Contents
- Key Takeaways
- Table of Contents
- What Is GLP-1 Injection Site Rotation?
- Why Rotate GLP-1 Injection Sites?
- Recommended GLP-1 Injection Sites
- How to Choose the Best GLP-1 Injection Site for You
- Practical Tips for Effective GLP-1 Injection Site Rotation
- Sample GLP-1 Injection Site Rotation Schedule
- Conclusion & Key Takeaways
- FAQ
What Is GLP-1 Injection Site Rotation?
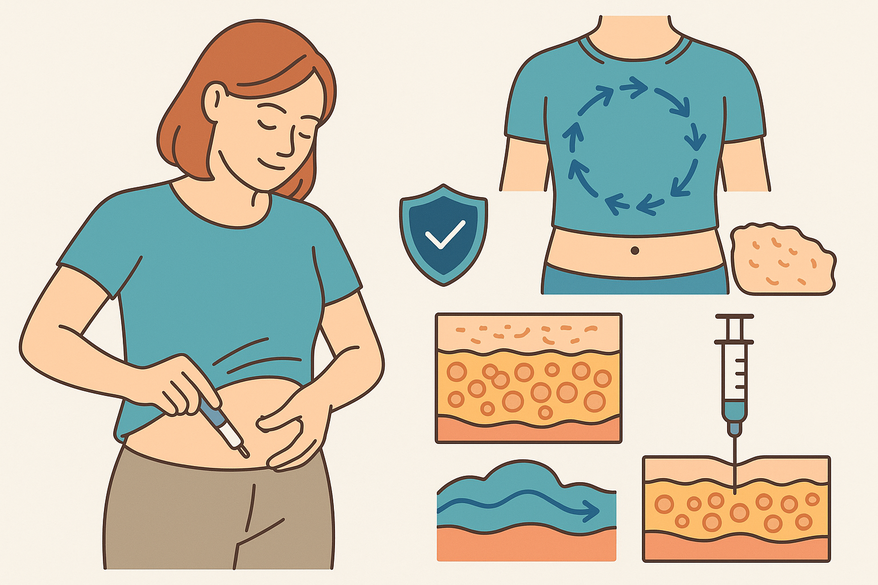
GLP-1 injection site rotation is the systematic practice of changing where you inject your GLP-1 dose under the skin each time. By spreading injections over different areas, you protect the subcutaneous layer from damage, scarring, and uneven absorption.
Subcutaneous Injection Technique- Choose a healthy fatty tissue site (abdomen, thigh, upper arm).
- Clean the skin with an alcohol swab; let it air dry.
- Pinch a 1-inch fold of skin to lift the fat layer away from muscle.
- Insert the needle fully at a 90° angle (45° if you are very lean).
- Inject medication slowly, then wait 5 seconds before withdrawing the needle.
For detailed steps and tips to perfect your injection skills, see our comprehensive guide.
Why Rotate GLP-1 Injection Sites?
Using the same spot repeatedly can lead to:
- Pain, Bruising, and Irritation: Nerve endings and blood vessels get irritated, causing soreness or bruising.
- Lipohypertrophy and Lipodystrophy: Fatty lumps and tissue changes impair absorption when medication concentrates in one area.
- Unpredictable Absorption: Scarred tissue absorbs medication at inconsistent rates, leading to blood-glucose swings.
- Compromised Skin Health: Rotation gives tissue time to heal and maintains even drug distribution.
Recommended GLP-1 Injection Sites
Rotate among three main zones. Always avoid scars, moles, or irritated skin.
Abdomen (Stomach)- Inject at least 2 inches (5 cm) away from the belly button.
- Stay in the “meaty” area, away from the rib cage and pelvis.
- Rotate within four quadrants: upper left, upper right, lower left, lower right.
 Thigh
Thigh
- Use the front or outer side of the thigh.
- Draw an invisible rectangle between hip and knee; inject in the middle third.
- Keep injections at least 1 inch apart within that zone.
- Choose the back or side (triceps area).
- You may need assistance or a mirror to reach the spot.
- Rotate between top, middle, and lower sections of the back arm.
How to Choose the Best GLP-1 Injection Site for You
- Ease of Access: Pick a spot you can reach comfortably or with help.
- Patient Comfort: Some zones feel less tender; test different areas.
- Sufficient Subcutaneous Fat: Aim for the fatty layer, not muscle.
- Clear Skin: Avoid scars or lumps to prevent unpredictable absorption.
Subcutaneous Tissue vs. Muscle: Pinch a skin fold to ensure you’re in fat—muscle uptake is too rapid and unpredictable.
Practical Tips for Effective GLP-1 Injection Site Rotation
- Rotate Every Injection: Never use the same spot back-to-back; move at least 1 inch (2.5 cm) away.
- Track Your Sites: Use a printable chart or a smartphone note—see our tips on logging each injection and visualizing your data.
- Clean and Prep: Wipe with an alcohol swab; let it dry fully. Don’t blow on the site.
- Needle Safety: Use a new, sterile needle each time and dispose in a puncture-proof sharps container.
- Observe and Adjust: Check for redness or lumps. If irritated, skip that area for 2–4 weeks.
Sample GLP-1 Injection Site Rotation Schedule
Customize for daily or weekly dosing:
| Daily Rotation (Once-Daily) | Site |
|---|---|
| Day 1 | Left abdomen |
| Day 2 | Right abdomen |
| Day 3 | Left thigh |
| Day 4 | Right thigh |
| Day 5 | Left upper arm |
| Day 6 | Right upper arm |
| Day 7 | Restart at left abdomen |
| Weekly Block Rotation (Once-Weekly) | Site |
|---|---|
| Week 1 | Left abdomen |
| Week 2 | Right abdomen |
| Week 3 | Left thigh |
| Week 4 | Right thigh |
| Week 5 | Left upper arm |
| Week 6 | Right upper arm |
| Week 7 | Restart at left abdomen |
Conclusion & Key Takeaways
Consistent GLP-1 injection site rotation is essential for:
- Reducing lipohypertrophy, bruising, and skin irritation
- Maintaining predictable drug absorption and stable blood-glucose control
- Preserving healthy subcutaneous tissue and overall injection comfort
Use a clear rotation schedule, log each injection, follow proper injection technique, and consult your healthcare provider if any site shows persistent lumps or scarring.
FAQ
What if one site becomes painful or develops a lump?
- Stop using that area until fully healed (2–4 weeks).
- If pain or lumps persist, consult your healthcare provider.
I forgot which site I used last—now what?
- Keep a real-time log or chart next to your medications.
- If unsure, choose a completely different approved site to avoid overlap.
Can I inject in other areas?
- Stick to the abdomen, thigh, and upper arm—other areas like buttocks or hip aren’t tested for GLP-1.
Does changing sites affect blood-sugar control?
- Proper rotation preserves steady absorption and consistent therapy.
- Random or unapproved site changes can lead to glucose variability.